MRI in Practice Online
Everything you need at one low price - delivered by qualified educators...
MRI in Practice Online is the world's longest running course of its kind and is presented three times per year in March, June and October. It is available to participants from any country and is divided into four main sessions, each requiring about one day of study time. Each event is held over 9 days allowing participants to pick and choose when to access the lectures.
With the ever-rising cost of living and tight squeezes on training budgets, we strive to offer the very highest quality MRI training and CPD fulfilment for a sensible, affordable, all-inclusive fee.
At £800 GBP, our course price is the most competitive it has ever been. Other providers charge high prices per hour of taught content, and may even charge separately for basics, advanced and clinical MRI as individual courses. With MRI in Practice you don't have to choose. Registration includes everything: the fundamentals (including safety), the advanced topics, and the clinical techniques — all in one comprehensive programme.
Our brand new ultra-modern, digital learning environment serves up lectures that can be watched, rewound, and revised on demand. Course authors Dr Catherine Westbrook and Dr John Talbot (both qualified in medical education to doctorate level, with 30 years of technology-enhanced-learning expertise) are on hand throughout.
We invite you to critically appraise any other MRI course on offer - are the presenters' qualifications stated (PGC(LT), PGC(HE), EdD)? They should be - and we challenge you to find one with a faculty who are actually qualified to teach.

That's not all — the entire Handbook of MRI Technique course is included free of charge.
Two amazing courses for less than you would expect to pay for one.
Over the years, participants have often suggested that they would like clinical technique sessions included in the course. Time limitations of the live delivery made this impossible to implement without extending the duration of the course. Now our new online format allows us to include this content - and at no extra cost. After fully completing the MRI in Practice course, participants are given on-demand access to watch the entire Handbook of MRI Technique course whenever it suits them.
The first five Handbook lectures are designed as the perfect revision companion to the topics covered by MRI in Practice. Many offer a different perspective, with new animated diagrams throughout. Participants tell us they really help to cement the concepts into place.
The remaining five lectures are indispensable for those who are new to the field and wish to get up to speed with clinical MRI practice, covering all of the most commonly scanned body areas: brain, spine, body, upper limb and lower limb. Did we mention this was FREE - yes we did - and with 12 months access to watch the lectures and test out your scanning skills on our MRI simulator.
Read on for some exciting news…

Brand new for 2026 - 12 months FREE ACCESS to our amazing MRI Simulator.
Understanding how pulse sequence parameters interact to produce clinically useful images requires more than textbook knowledge — it demands hands-on experience with the cause-and-effect relationships between acquisition settings and the resulting image.
Our new Virtual MRI Console addresses this educational challenge directly.
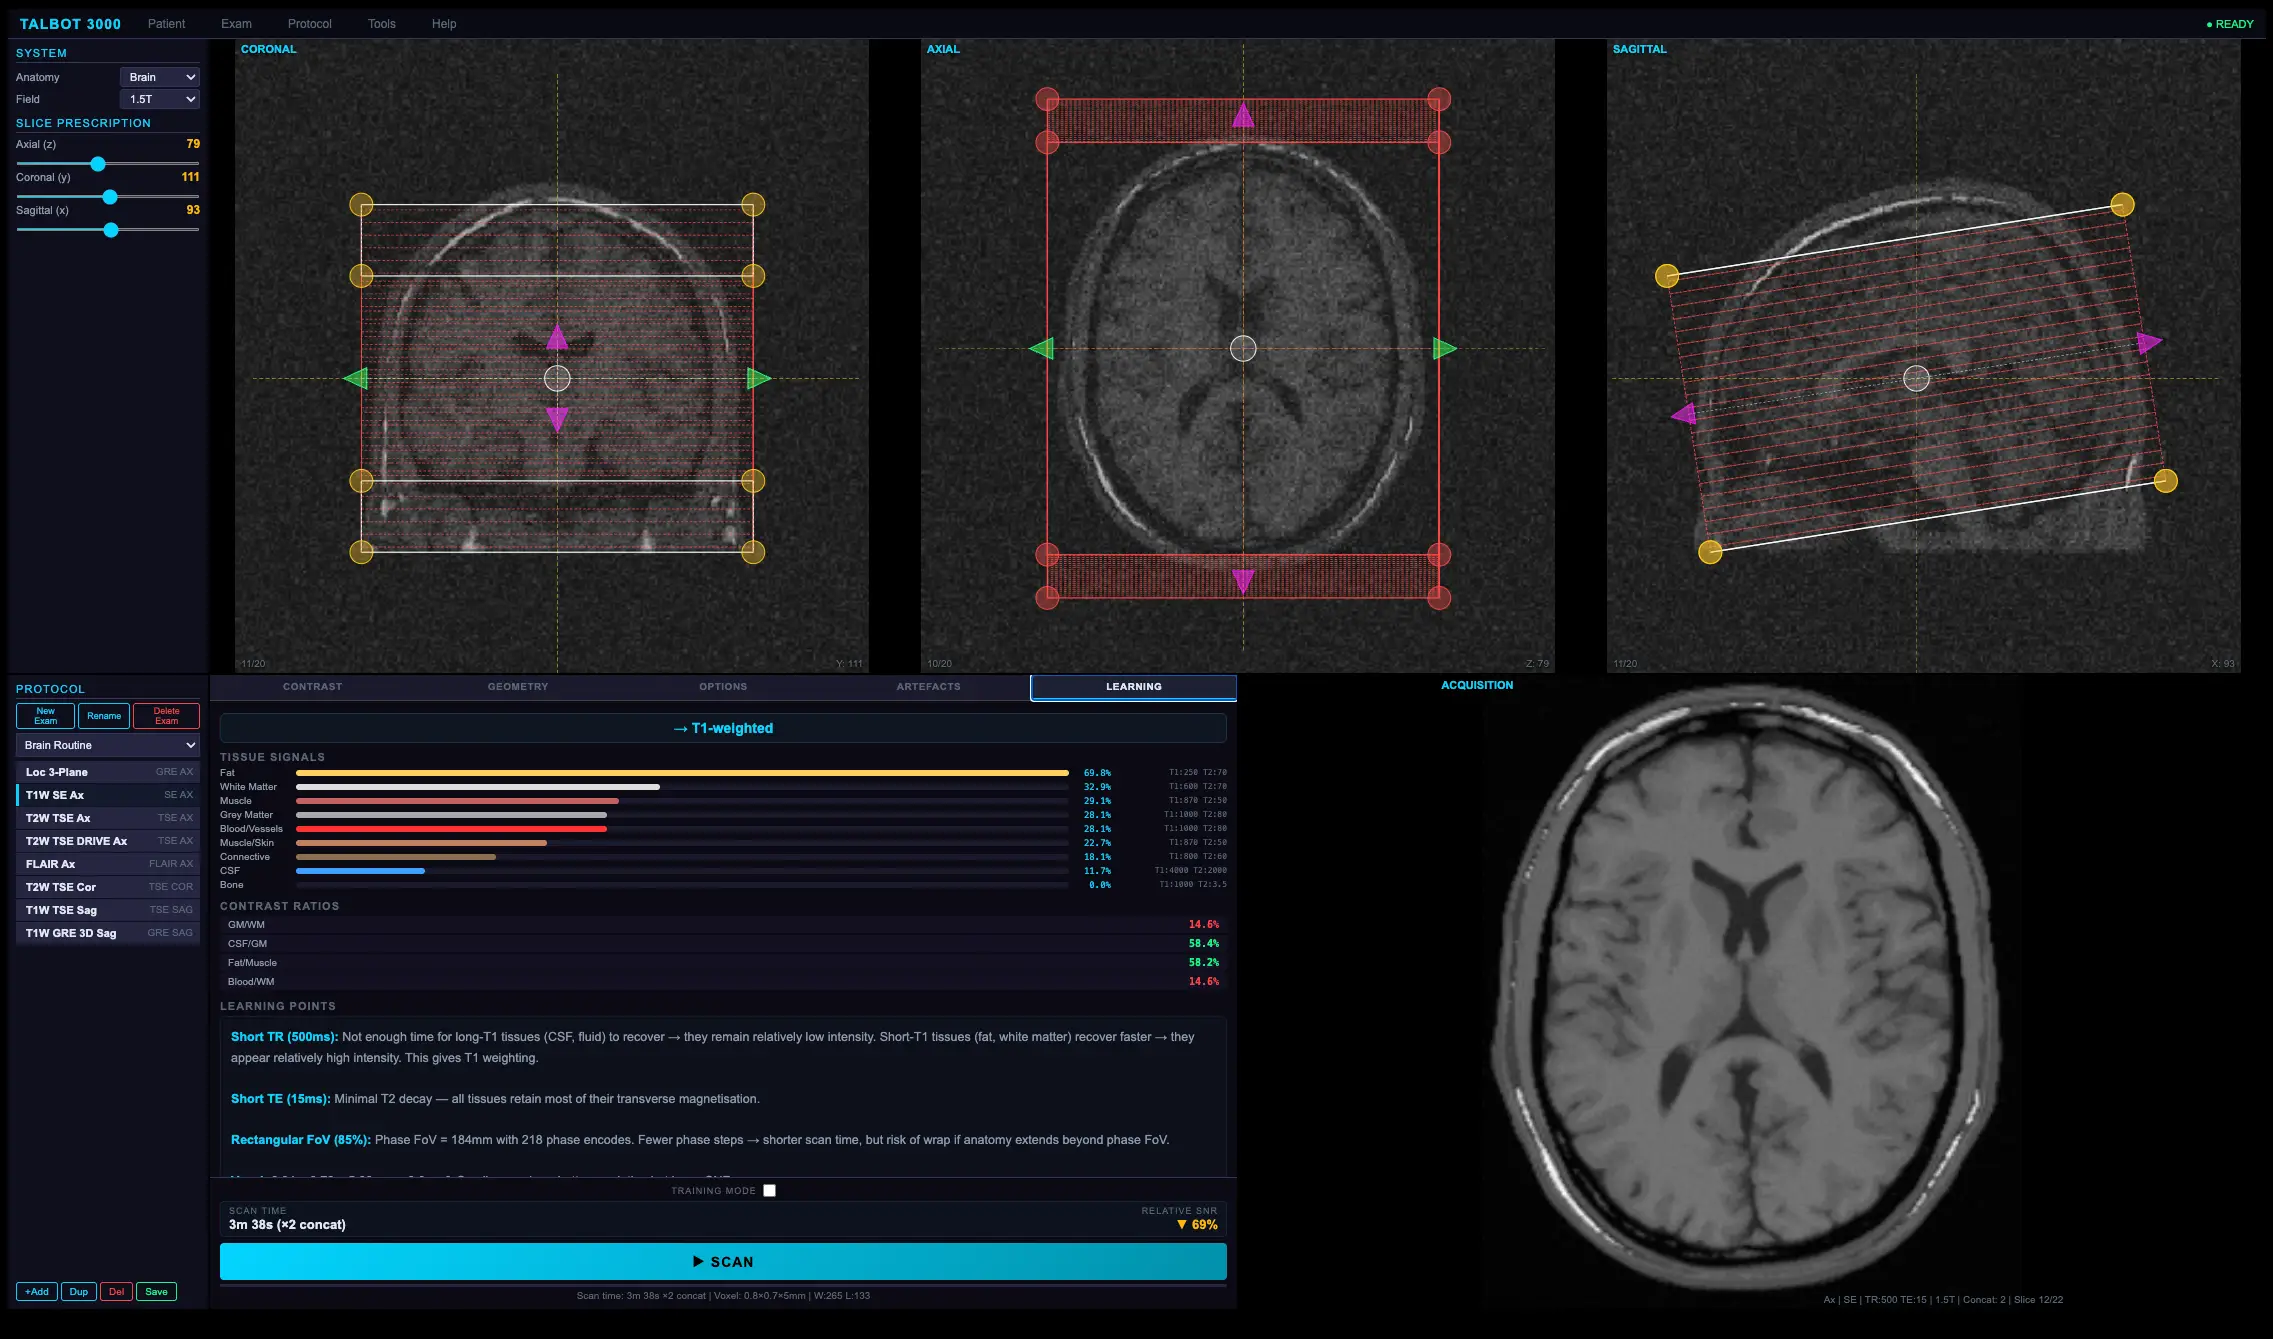
Developed in-house by Dr John Talbot, a leading web and app developer since the early days of the internet (1999) and qualified to doctoral level in tech-learning, this is a browser-based simulator that places a functional MRI console in the hands of every student. No scanner access required. No patient risk. No booking conflicts. Just immediate, interactive, consequence-free exploration of MRI physics and image optimisation.
This simulator is dedicated to learning about image contrast and image optimisation and has been designed and built from the ground up to mesh with our lectures. Every topic we cover on the course relating to image contrast, artefacts and image optimisation can now be accurately explored using the simulator via 50 provided learning activities.
Remember, our name is MRI in PRACTICE and this simulator keeps us right at the forefront of that underpinning principle. No other course can match our perfect synchronicity between underpinning physics, our book, our lectures our simulator and your clinical outcomes.
The Educational Challenge
Newly qualified radiographers and trainee radiologists face a steep learning curve when they begin clinical MRI practice. The relationships between TR, TE, TI, flip angle, bandwidth, matrix size, field of view, and the resulting image contrast are complex, interdependent, and often counter-intuitive. Traditional teaching methods — lectures, textbooks, observation — can describe these relationships, but they cannot replicate the experience of sitting at a console and watching an image change in real time as each parameter is adjusted.
Scanner time is expensive, clinically allocated, and rarely available for teaching purposes. Even when training slots can be arranged, the learning opportunity is limited by the need to work with real patients and the pressure to produce clinically acceptable images. There is no opportunity to set deliberately poor parameters, observe the result, and understand why it failed.
Our simulator removes these barriers entirely.
Physics-Driven Simulation
Unlike simplified teaching aids that display pre-rendered images or use look-up tables, our simulator calculates every pixel of every image from first principles using the Bloch equations. Signal intensity for each tissue type is computed in real time based on its T1, T2, and proton density values at the selected field strength, using the exact signal equations for the chosen pulse sequence. The result is a realistic synthetic MR image that responds to parameter changes with the same physics that governs a real scanner.
This approach means there are no artificial limits on what the student can explore. Every combination of parameters produces a physically meaningful result, even if that result is a poor image. A student who sets TR too short for T2 weighting will see the T1 contrast leak into their image. A student who selects an inappropriately high echo train length will see phase-direction blurring develop. A student who reduces bandwidth too aggressively will observe chemical shift artefact grow at fat–water interfaces. Every mistake becomes a teaching moment.

Capabilities
Pulse Sequence Library
The simulator provides a comprehensive library of pulse sequence implementations, each with correct signal equations, clinically appropriate parameter ranges, and generic protocol naming:
- Spin Echo (SE) — the foundational sequence for understanding T1, T2, and proton density weighting through TR and TE manipulation.
- Turbo Spin Echo (TSE) — with echo train length control, phase-direction blurring simulation, and magnetisation transfer contrast effects that realistically reduce grey–white matter differentiation at high ETL. ETL auto-sets to appropriate values based on matrix size.
- Gradient Echo (GRE) — implemented as three distinct sub-types: Spoiled (SPGR/FLASH/T1-FFE), Rewound (GRASS/FISP/FFE), and Balanced SSFP (TrueFISP/FIESTA/b-FFE), each with its own steady-state signal equation and characteristic contrast behaviour. Flip angle control demonstrates the Ernst angle relationship and its effect on T1 contrast.
- Inversion Recovery (IR) — with adjustable TI for selective tissue nulling. Presets automatically calculate field-strength-appropriate null points for white matter and grey matter.
- STIR — with field-strength-adaptive fat nulling and educational warnings about contraindication with gadolinium contrast.
- FLAIR — with field-strength-adaptive CSF nulling for periventricular lesion conspicuity.
- Single-Shot TSE (SS-TSE) — also known as HASTE (Siemens), SS-FSE (GE), or SSH-TSE (Philips). Fills the entire k-space in a single TR using very long echo trains, demonstrating the trade-off between acquisition speed and T2 blurring. ETL automatically matches the phase matrix size.
- Spin Echo EPI (SE-EPI) — single-shot echo planar imaging with spin echo preparation, demonstrating the extreme speed and characteristic geometric distortion, susceptibility artefacts, and chemical shift effects of EPI readouts.
- Gradient Echo EPI (GRE-EPI) — single-shot EPI with gradient echo preparation and T2* weighting, showing the increased susceptibility sensitivity compared to the spin echo variant.
- Diffusion Weighted Imaging (DWI) — based on the Stejskal-Tanner pulsed gradient scheme with adjustable b-value. Demonstrates how increasing diffusion sensitisation suppresses signal from freely mobile water while retaining signal from restricted diffusion environments. Generates b=0 reference images alongside diffusion-weighted images for comparison.
- Dixon (Two-Point) — acquires in-phase and opposed-phase echoes to generate separate water-only and fat-only images, plus the conventional in-phase and opposed-phase contrast. Demonstrates the chemical shift-based fat-water separation principle and the India ink artefact at fat-water boundaries.
- Driven Equilibrium (DRIVE) — available as a toggle on TSE, STIR, and FLAIR sequences. Also known as RESTORE (Siemens) or FR-FSE (GE). At the end of each echo train, a −90° tip-up pulse restores remaining transverse magnetisation back to the longitudinal axis. This dramatically boosts signal recovery for long-T2 tissues such as CSF and fluid, enabling T2-weighted imaging with significantly shorter TR and reduced scan time. Short-T2 tissues are barely affected. Students can directly compare standard T2W TSE at TR 4000 ms with a DRIVE-enhanced version at TR 2000 ms and observe that CSF brightness is maintained while scan time is halved. [NEW]
- 3D Volumetric Acquisition — available as a 2D/3D toggle on SE, TSE, GRE, IR, STIR, and FLAIR sequences. Switches from conventional 2D multi-slice excitation to slab-selective 3D acquisition with phase encoding in both the in-plane and partition (slice) directions. Produces contiguous, gap-free partitions through the slab with no cross-talk artefact, an SNR boost proportional to the square root of the number of partitions, and the ability to achieve sub-millimetre isotropic or near-isotropic voxels suitable for multiplanar reformatting. Demonstrates the scan time cost of the additional partition-encoding dimension and the occurrence of slab wrap-around aliasing when anatomy extends beyond the excited slab. Built-in protocols include 3D T1W GRE (SPGR/VIBE/LAVA/BRAVO style) and 3D FLAIR examples for both brain and abdomen. [NEW]
Comprehensive Parameter Control
Comprehensive Parameter Control
Every clinically relevant acquisition parameter is independently adjustable, giving students full control over the signal-to-noise, spatial resolution, and scan time trade-offs that define real-world protocol optimisation:
- Timing parameters: TR (2–10,000 ms), TE (1–300 ms), TI (10–5,000 ms), flip angle (1–90°), echo train length (2–32).
- Spatial parameters: FOV (100–500 mm), rectangular FOV (50–100%), phase encoding direction, frequency matrix (64–512), phase matrix (64–512), slice thickness (1–10 mm).
- Signal quality: NEX (1–4), parallel imaging acceleration (R = 1–4) with g-factor noise penalty, receiver bandwidth (50–500 Hz/pixel).
- Clinical options: frequency-selective fat saturation, intravenous gadolinium contrast simulation with flow void modelling, no phase wrap oversampling, Driven Equilibrium (DRIVE/RESTORE) for TSE variants, and 2D multi-slice or 3D volumetric acquisition mode with adjustable slab thickness and partition count.
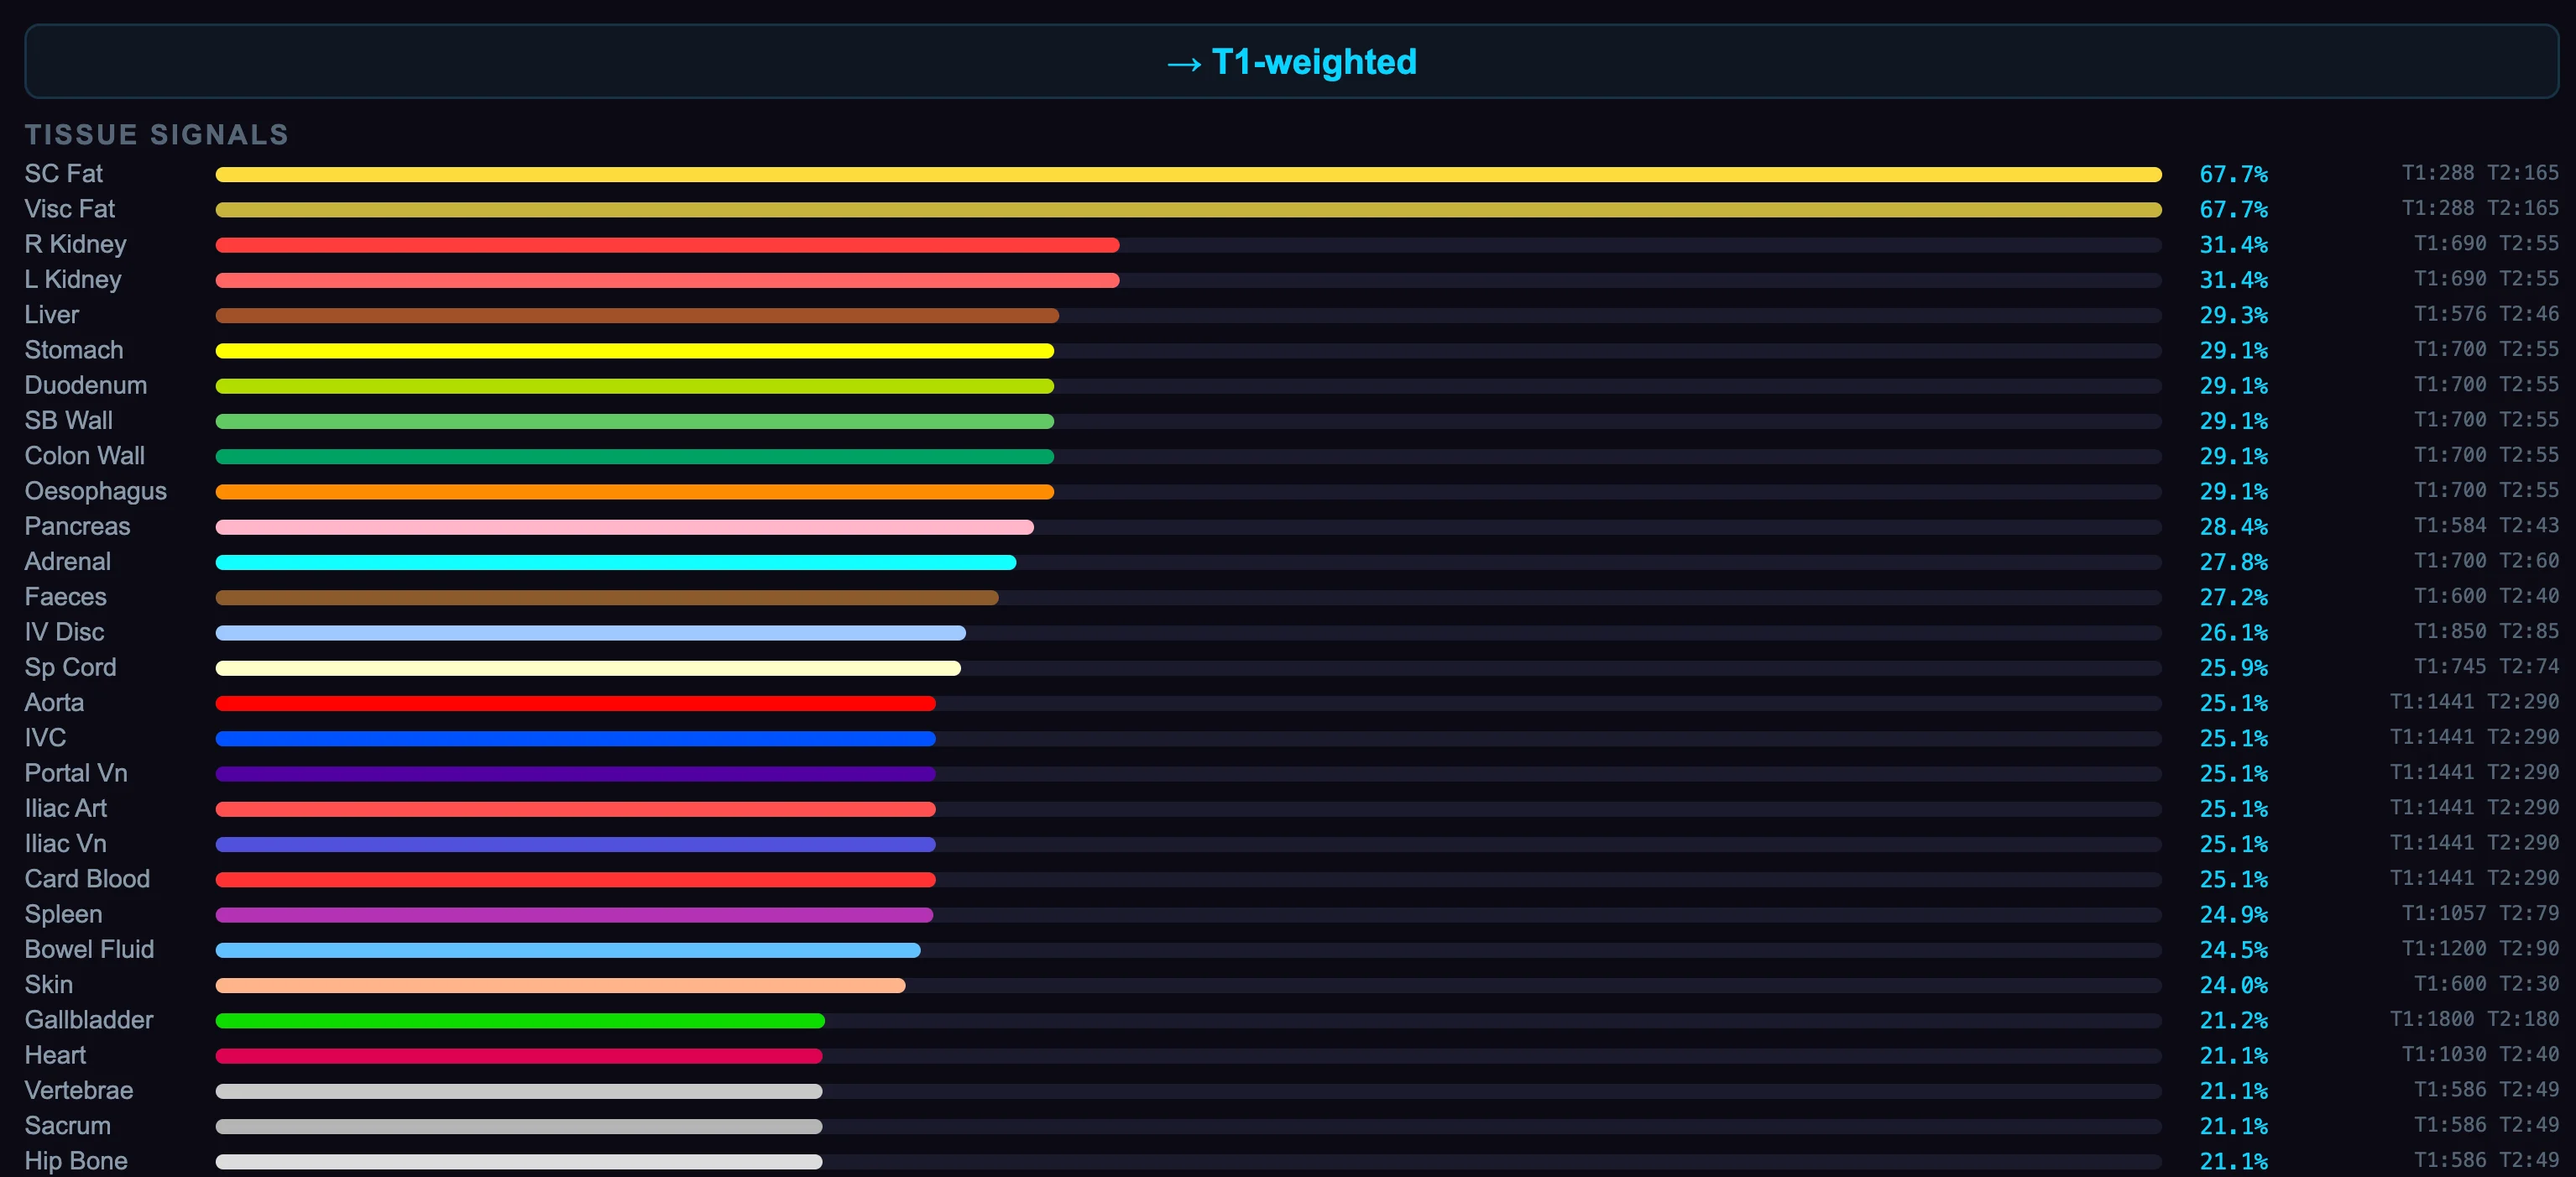
Tissue signal calculations for every slice
Multi-Anatomy, Multi-Field-Strength Design
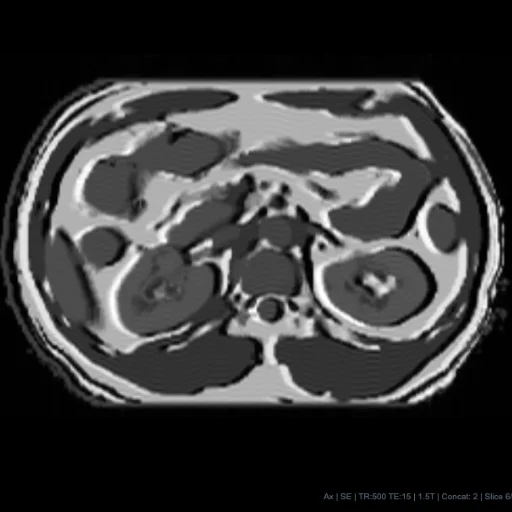
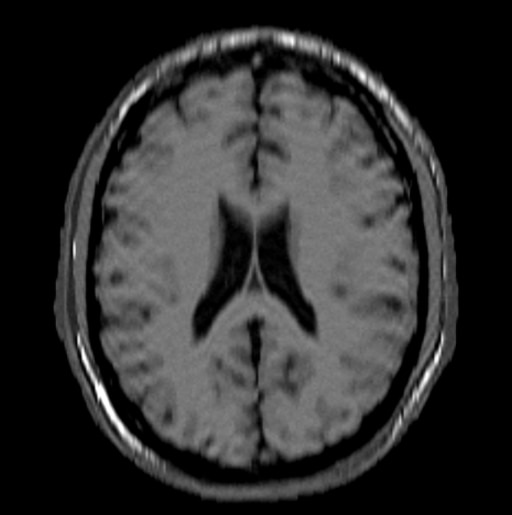
The simulator includes accurately segmented tissue maps for two anatomical regions — axial brain (eight tissue types including cortical bone, CSF, grey matter, white matter, fat, muscle, skin, and blood) and abdomen (all tissue types). Each anatomy can be imaged at 0.5T, 1.5T, or 3.0T, with a complete tissue relaxation database providing field-strength-dependent T1, T2, and proton density values derived from the published topic literature.
More anatomical areas are scheduled to be added shortly - and all upgrades will be accessible to our participants over the duration of their access period.
Artefact Simulation
Understanding artefacts is essential for clinical practice, yet difficult to teach without hands-on experience. Our simulator reproduces all of the major acquisition-related artefacts encountered in routine imaging, each with physically correct behaviour that responds to parameter changes exactly as it would on a real scanner:
- Phase wrap-around — visible when the phase FOV is smaller than the anatomy, with correct wrap direction that follows the user's chosen phase-encoding axis. Removable with the no-phase-wrap oversampling toggle, which doubles acquisition in the phase direction at the cost of scan time.
- 3D slab wrap-around — in 3D volumetric mode, the partition direction is phase-encoded rather than slice-selected. Anatomy extending beyond the excited slab wraps into the volume from the opposite end, appearing superimposed on the edge partitions. This is the 3D equivalent of in-plane phase wrap and emerges naturally from the partition-encoding physics. The Learning panel detects when tissue is present outside the slab and provides specific guidance on solutions including increasing slab coverage or applying spatial saturation bands. [NEW]
- Chemical shift (Type 1) — bandwidth-dependent spatial misregistration at fat–water interfaces, correctly scaled to field strength and displayed in the frequency-encoding direction. Students can directly observe how increasing receiver bandwidth reduces the displacement at the expense of signal-to-noise ratio.
- Chemical shift (Type 2 / out-of-phase signal loss) — signal cancellation at fat–water boundaries on opposed-phase gradient echo images, visible in the Dixon opposed-phase reconstruction and at specific echo times on GRE sequences.
- TSE blurring — T2-dependent signal decay across the echo train causing high-spatial-frequency attenuation in the phase-encoding direction. Becomes progressively more pronounced as echo train length increases, particularly visible on tissues with short T2.
- Truncation (Gibbs ringing) — oscillatory signal ringing at high-contrast interfaces caused by truncation of k-space at low matrix sizes. Correctly manifests as alternating bright and dark bands parallel to sharp tissue boundaries and diminishes as matrix resolution increases.
- Cross-talk — signal loss from incomplete magnetisation recovery between adjacent 2D slices. Worsens with small or negative slice gaps and short TR values, and is mitigated by automatic concatenation when the number of slices exceeds the TR capacity. The simulator correctly models interleaved slice ordering across concatenations and the resulting reduction in cross-talk. Eliminated entirely in 3D acquisition mode, where the slab is uniformly excited with no imperfect slice profiles. [NEW]
- Motion artefact — periodic ghosting propagated in the phase-encoding direction from simulated patient motion during acquisition. Demonstrates why motion ghosts appear along the phase axis regardless of the actual direction of movement.
- RF noise spike (zipper artefact) — simulates the effect of a corrupted data point in k-space from external RF interference, producing a characteristic striped zipper pattern across the image. Students can visualise the corresponding spike in the k-space display.
- Phase mismapping — k-space visualisation showing how data collected at different echo times during a TSE echo train maps to different phase-encoding lines, with an interactive graphic illustrating the relationship between echo position, k-space location, and resulting image contrast.
- EPI geometric distortion — susceptibility-induced spatial distortion characteristic of echo planar imaging sequences, demonstrating why EPI images show warping in the phase-encoding direction near air–tissue interfaces.
- Realistic noise modelling — signal-dependent Gaussian noise that responds correctly to voxel volume, number of signal averages (NEX/NSA), receiver bandwidth, field strength, parallel imaging acceleration factor, and 3D partition count. In 3D acquisition mode, the SNR boost from partition encoding (proportional to √partitions) is correctly applied, allowing students to directly compare noise levels between equivalent 2D and 3D acquisitions.

Aliasing
Chemical Shift

Echo Train Blur
Truncation
Our course covers 26 different artefacts - it's better that our new course participants can learn about these disasters on the simulator rather than on real patients during a busy list!
Protocol Optimisation Engine
The Optimise engine embedded within the simulator encapsulates the protocol design expertise that typically takes years of clinical experience to develop. For any given combination of pulse sequence, image weighting, anatomy, and field strength, the engine calculates a complete optimised protocol that balances diagnostic image quality against acquisition time — the fundamental trade-off at the heart of every MRI examination.
The optimisation considers the full parameter space: timing parameters for contrast, spatial parameters for resolution and coverage, receiver bandwidth for SNR and chemical shift control, parallel imaging for scan time reduction with appropriate g-factor trade-off, signal averaging for thin-slice SNR compensation, phase encoding direction for anatomy-appropriate wrap avoidance, and fat saturation where clinically indicated.
When the student engages with the built-in Learning Mode function, they can build a sequence/protocol from scratch - test the image appearance with every change and when they are done, the feedback report provides specific, educational commentary on every parameter that differs from the optimised protocol. This commentary explains not just what should change, but why — linking each adjustment to its physical consequence in terms of contrast, resolution, SNR, artefact behaviour, or scan time. Estimated scan times are displayed for both protocols, quantifying the time penalty of suboptimal parameter choices.
Technical Specification
Our simulator was designed an built in-house by Dr John Talbot, whose doctoral thesis was in the field of technology enhanced learning. It is delivered as a browser-based application requiring no software installation, plug-ins, or dedicated hardware. It runs in any modern web browser on desktop, laptop, or tablet devices. Image rendering is performed client-side in real time, providing instantaneous visual feedback as parameters are adjusted. The tissue maps, relaxation database, and edge detail overlays are served from a secure, authenticated server environment integrated with the MRI in Practice online learning platform.
Physics fans only…
SIGNAL MODEL
The Talbot 3000 computes signal intensity per voxel from the Bloch equations using tissue-specific T₁, T₂, and ρ values drawn from a field-strength-indexed relaxation database (0.5 T, 1.5 T, 3.0 T) compiled from Stanisz et al. (2005), de Bazelaire et al. (2004), and Gold et al. (2004). The full pulse sequence library is implemented with closed-form steady-state signal equations: SE (ρ(1−e⁻ᵀᴿ/ᵀ¹)e⁻ᵀᴱ/ᵀ²), TSE with effective-TE echo-train modulation and MT attenuation coefficients, three GRE sub-types (spoiled: Ernst-angle steady-state; rewound: √(T₂/T₁)-dependent SSFP−FID; balanced: T₂/T₁-weighted bSSFP with near-unity ρ weighting), IR, STIR, and FLAIR with full longitudinal recovery/inversion terms, single-shot TSE, SE-EPI, GRE-EPI, DWI with per-tissue ADC-based diffusion attenuation, and two-point Dixon with in-phase/opposed-phase fat–water separation.
Driven Equilibrium (DRIVE) modifies the TSE, STIR, and FLAIR signal equations to account for the −90° tip-up pulse at the end of each echo train. The remaining transverse magnetisation after the echo train, M_xy = ρ·exp(−ETL·ESP/T₂), is restored to Mz by the DRIVE pulse. The starting longitudinal magnetisation for the next TR becomes Mz = ρ·[1 − exp(−TR/T₁)·(1 − exp(−ETL·ESP/T₂))], replacing the standard ρ·(1 − exp(−TR/T₁)). For tissues with long T₂ (CSF, T₂ ≈ 2000 ms), the correction term approaches zero and Mz approaches ρ regardless of TR — explaining why DRIVE enables T2-weighted imaging with dramatically shorter TR. For short-T₂ tissues, the correction is negligible and the signal is unchanged. [NEW]
3D volumetric acquisition replaces slice-selective excitation with slab-selective excitation and adds a second phase-encoding dimension along the partition (slice) direction. The scan time becomes TR × phase_PE × partitions × NEX / ETL / PI. The SNR benefit arises from the coherent signal contribution of all partitions, yielding an improvement factor of √(partitions) over equivalent 2D slices. [NEW]
Fat saturation applies a 90% signal attenuation factor to lipid-labelled voxels. Gadolinium contrast modifies T₁ via the relaxivity relation 1/T₁,post = 1/T₁,pre + r₁[Gd], with r₁ = 4.5 mM⁻¹s⁻¹ at 1.5 T, and models flow-void signal loss in vascular structures.
K-SPACE RECONSTRUCTION PIPELINE
Image formation follows a physically authentic reconstruction chain. A 512×512 complex signal matrix S(x,y) is generated from the tissue map and Bloch-equation signal values, with separate fat and non-fat channels to permit frequency-direction chemical shift displacement (Δx = δf_cs/BW, where δf_cs = 224 Hz × B₀/1.5). The composite image undergoes a 2D radix-2 Cooley–Tukey FFT to produce complex k-space data K(kₓ,kᵧ). All subsequent manipulations occur in the frequency domain:
Matrix truncation. K-space is zeroed outside the user-selected frequency and phase acquisition window (m_freq × m_phase lines centred at DC). The resulting Sinc-convolution in image space produces Gibbs truncation ringing at sharp signal boundaries — the artefact is not simulated; it emerges naturally from the mathematics of finite Fourier sampling.
TSE T₂ modulation. For turbo spin echo acquisitions, each phase-encode line is weighted by exp(−ΔTE(k)/T₂,eff), where ΔTE(k) is the temporal offset from the effective TE based on the line's radial distance from k-space centre and the echo spacing (≈10 ms). This applies a low-pass filter in the phase direction whose width is proportional to ETL, reproducing the characteristic high-spatial-frequency attenuation responsible for TSE blurring.
Parallel imaging. At acceleration factor R > 1, every Rᵗʰ phase-encode line is zeroed in k-space, producing the FOV/R aliased reconstruction visible when GRAPPA reconstruction is disabled. Toggling GRAPPA ON restores fully-sampled k-space with an SNR penalty of √R × g, where the geometry factor g = 1 + 0.15(R−1) models spatially-varying noise amplification from coil sensitivity inversion.
Noise injection. Complex Gaussian noise is added to k-space prior to inverse transform: n(k) ~ ℂ𝒩(0, σₖ²), where σₖ is derived from the voxel-volume SNR model σ ∝ V_vox½ × √NEX × B₀ / (√BW × √R × g). For 3D acquisitions, σₖ is further reduced by √(partitions) to model the coherent signal averaging across the partition-encoding dimension. This is physically correct: receiver noise enters in the frequency domain, producing spatially uncorrelated noise after magnitude reconstruction. [UPDATED — added 3D SNR factor]
3D slab wrap-around. In 3D volumetric mode, the partition direction is phase-encoded. Anatomy outside the excited slab is sampled at offset positions of ±N × slab_thickness along the slice-normal vector, where N ranges over wrap copies sufficient to cover the full anatomy extent. The wrapped signal is added to each partition's image data prior to k-space transformation, producing aliased anatomy at the slab edges that is indistinguishable from the primary signal — exactly as occurs on a real scanner. This artefact emerges from the partition-encoding geometry, not from any post-hoc overlay. [NEW]
Cross-talk simulation. For 2D multi-slice acquisitions, the simulator models incomplete longitudinal recovery between adjacent slices due to imperfect slice profiles. Signal attenuation increases with smaller slice gaps and shorter TR, and is mitigated by automatic concatenation which interleaves slice ordering across separate TR groups. In 3D mode, cross-talk is absent because the entire slab is uniformly excited. [NEW]
K-space spike artefacts. User-placed point impulses are inserted at (kₓ,kᵧ) with Hermitian-conjugate symmetry enforced at (−kₓ,−kᵧ) to maintain real-valued image reconstruction. Each spike produces a sinusoidal modulation pattern across the image at a spatial frequency and orientation determined by its k-space coordinates — reproducing the 'corduroy' or 'zipper' artefact caused by RF interference or electronic faults.
The manipulated k-space undergoes inverse 2D FFT followed by magnitude reconstruction |√(Re² + Im²)|. The result is downsampled to the acquisition matrix, with optional zero-fill interpolation (k-space zero-padding) for display. Window/level adjustment and a transparent anatomical edge overlay (Sobel gradient magnitude extracted from original MR data) are applied as final compositing steps.
ARTEFACT FIDELITY
Every artefact in the Talbot 3000 is a consequence of the acquisition physics, not a post-hoc visual effect. Gibbs ringing arises from k-space truncation. Phase wrap arises from sub-Nyquist spatial sampling. Chemical shift arises from the fat–water frequency offset in the readout gradient. TSE blurring arises from T₂ decay across the echo train. Parallel imaging aliasing arises from phase-encode undersampling. Cross-talk arises from incomplete longitudinal recovery between adjacent 2D slices. 3D slab wrap arises from partition-direction phase encoding of anatomy beyond the excited slab. Noise texture arises from complex Gaussian contamination in the frequency domain. The simulator does not contain a single line of code that draws, overlays, or fakes an artefact. They emerge from the actual signal processing just as they would on a real scanner.
What the MRI education experts are saying about the course...
Our participants love the course - 94% excellence score over the last 20 years - but what do the real MRI education experts say?
-

Dear John and Catherine, your course is, without a doubt, the best online course there is. I was especially impressed by the simulator. It is, by far, the best simulator I have ever seen.
All the variations with contrast, slice positioning and artefacts were very clear, and the user interface very intuitive.
(Adjunct Professor and Medical physicist, Oulu) -
As a teacher myself, the thing that I have learned is that in MRI education we need genuine experts to teach it,
because this fascinating modality deserves nothing less. For my part, your job is safe for the foreseeable future! Many thanks.
(MRI Lecturer, London) -
Hello John, I just had a look at your (Spatial Encoding) lecture. Absolutely outstanding. I can only imagine the amount of time you had to put into this. The graphics are superb and it does an excellent job of telling a very complex story. I understand that it requires great care to get these animations correct. You have done an outstanding job.
(Emeritus Professor of Health Sciences, Toronto) -
Incredible lecture series, and truthfully one of the most rewarding academic experiences in my adult life.
The graphics are as astounding as the ease at which Dr. Talbot and Dr. Westbrook navigate the physics of MRI.
Truly brilliant! Thank you.
(MRI Educator, Chicago) -
I am a MSK radiologist. This is not just the best MRI course I have been on - it is the best course I have ever attended.
Your graphics were so clever and the presentations were fantastic." (Teaching Radiologist, Oslo)
What exactly is included in the price?
In summary, participants will enjoy:
✔️ 9 days online teaching via our custom-built online learning environment
✔️ All-day access to the world-renowned MRI educators Dr. Catherine Westbrook and Dr. John Talbot via messages, chat, text, audio and video channels.
✔️ 24/7 access to a personal MRI mentor (in-house chatbot) providing accurate and insightful Q&A instantly when the UK presenters are off line.
✔️ 26 streaming lectures featuring our famous computer generated imagery, namely…
✔️ 16 MRI in Practice lectures (20 hours).
✔️ 12-month access to our 10 Handbook of MRI lectures (6 hours of revision videos and clinical technique instruction).
✔️ 12-month access to our incredible MRI Simulator.
✔️ Over 50 valuable learning exercises to run on our simulator that link theory to practice.
✔️ Interactive revision sessions for every main topic.
✔️ 100 interactive animations accessed from our learning portal.
Made by humans - for humans - guaranteed free from AI slop found in most online lectures and all at a price that beats any of our competitors.
Wave goodbye to rostering clashes and study leave problems
The 9 day event is completely flexible - participants choose which days to attend. The examples shown below are just for guidance. Everyone gets the full 9 days access, so there is no requirement to commit to any attendance pattern in advance. At the end of 9 days (or when the participant is happy that they have completed the 16 core lectures) they can then access our Handbook of MRI Technique course and continue to access our MRI simulator at any time over the following 12 months

Continuing Professional Development - we've got you covered...
Endorsed by the UK Society and College of Radiographers (CPD Now) and
Australian Society of Medical Imaging and Radiation Therapy
The Society and College of Radiographers.
The Certificate of Endorsement states that this course supports the following important outcomes:
01. Practical skills
02. Knowledge base
03. Work safely
06. Manage knowledge/information
07. High-quality healthcare/education services
08. Patient-centred care and choice
09. Inter-professional/agency working or learning
11. Workforce development or staff governance
12. Service design
19. Evidence to support practice
If you are considering registering for an MRI course other than MRI in Practice, ask for evidence that they have CPD NOW endorsement and check how many of the above outcomes are supported. This is an important benchmark and without such it is likely that a course is not fit for purpose as a CPD resource. Please note that we have outcome 7 - which is your assurance of the high-quality of our courses.
Australian Society of Medical Imaging and Radiation Therapy award 30 Units of CPD for the course.
Scandinavia and Europe. We award generic CPD certificates to all participants from Scandinavia and Europe.
For any other country (with the sole exception of the USA) the course is also likely to be considered a valuable source of CPD. Please see the course info page for more information.

Helping you reflect.
Writing a reflective portfolio can be fairly intimidating for many people, but we are here to support you for the entire duration of the CPD certificate. Everyone who attends our course for CPD achievement is given their own CPD page for 2 years. This has a copy of your certificate and also a CPD information panel that reminds you of all the activities you have undertaken. This makes writing a reflective CPD portfolio very easy because the page also explains exactly how to link the learning gained from these activities to the specific relevant learning outcomes supported by the course.
As professional academics we have been supervising and supporting adult learners for the last 25 years. We are very familiar with critical evaluation and reflective practice, because these skills were required by our Masters students. John has written a guide, offered as a browsable document, that tells you all about reflective practice, reflective models and explains exactly how to map the specific learning from this course against the CPD outcomes it supports in context of providing evidence to your professional body. All you need to do is follow our detailed guidance and apply it to your own particular needs.

Your assurance of quality
If you are a manager or practice education lead, the price is important, but you will also be looking for the highest quality educational experience for your staff. The quality of this course is assured:
- We are not only endorsed by the Society and College of Radiographers, but also by over 20 international professional bodies and educational establishments.
- We are the go-to MRI education provider for the NHS and several of the largest private medical companies.
- Our courses have been used to enhance the MRI curriculum in university programmes in Chicago, Cambridge, Oxford, Dublin, Columbia (Missouri), Qatar, Sharjah, and Zagreb.
- The course has also been adopted by professional bodies in Australia, Sweden, Norway, Croatia, Kuwait, Malta, Romania, Kenya and Serbia.
- The presenters, Dr Catherine Westbrook and Dr John Talbot are both industry-recognised experts in online learning (since 2005) both hold Master of Science Degrees in MRI, are both qualified in Education to Doctoral level and are both Fellows of the Higher Education Academy.
We are not aware of any other MRI courses having a faculty qualified to this level. It seems obvious that an MRI education course should use presenters who are qualified in both MRI and education, but not all of them are. Please take care when deciding on a course provider, fraudulent or fake education is becoming an increasing concern in pedagogical circles, especially with recent developments in AI. If you are in any doubt about an education provider not having the necessary qualifications to be providing educational services, ask to see the learning and teaching certification for all members of their faculty. This must at least be a PgC in Learning and Teaching, and for teaching post graduates (such as radiographers) it should be an EdD or equivalent.
Our current global participant ratings are shown below...
Our Forthcoming Courses
We run three courses per year. Every course is open to all countries except China and Russia (who currently do not support this content).
Global translation options (closed captions in 249 major languages) are available for all the lectures and activities.
The course is accessible for 9 days, you can attend whichever days you like. We recommend putting aside 4 study days as a minimum. Those can be split over 2 weekends if required.

MRI in Practice - October Course
10 Oct 2026 - 18 Oct 2026
Open to all international locations.
The recommended study allocation is 4 days.
Participants may attend at any time over the 9 day event.
UK - CPD Now (Society and College of Radiographers) Certificate of Endorsement states that this course supports TEN learning outcomes.
Australian Society of Medical Imaging and Radiation Therapy - Awards 30 Units of credit.
Course fee: £800
Presented by Dr Catherine Westbrook and Dr John Talbot
Day 01 Lecture Menu
✓ Basic Principles (Westbrook)
✓ Image Contrast (Westbrook)
✓ MRI Instrumentation (Talbot)
✓ Introduction to MRI Safety (Talbot)
Plus revision sessions and interactive animated diagrams covering:
✓ Basic Principles
✓ Image Contrast
✓ Instrumentation
✓ Safety
Plus On-Demand revision videos covering:
✓ Fundamentals of MRI (Talbot)
✓ Image Contrast (Talbot)
✓ Introduction to MRI Safety (Talbot)
✓ Safety (Talbot)
Plus Learning exercise on our MRI Simulator covering:
✓ Basic Principles
✓ Image contrast
Presented by Dr Catherine Westbrook and Dr John Talbot
Day 02 Lecture Menu
✓ Spin Echo Sequences (Talbot)
✓ Fast Spin Echo and Inversion Recovery Sequences (Talbot)
✓ Gradient Echo Principles (Westbrook)
✓ Gradient Echo Sequences (Westbrook)
Plus revision sessions and interactive animated diagrams covering:
✓ Gradient Echo Sequences
✓ Image Contrast
✓ Spin Echo Sequences
Plus On-Demand Revision Video covering:
✓ Pulse Sequences and Image Contrast (Talbot)
Plus learning activities on our MRI Simulator (available for 12 months after the course):
✓ Spin Echo Sequences
✓ Gradient Echo Sequences
✓ Image Contrast
Presented by Dr Catherine Westbrook and Dr John Talbot
Day 03 Lecture Menu
✓ Image Production Overview (Talbot)
✓ k-Space 01 - An introduction to k-space (Westbrook)
✓ k-Space 02 - Data Acquisition and Image Production (Westbrook)
✓ k-Space 03 - Non-Cartesian Filling Methods (Westbrook)
Plus revision sessions and interactive animated diagrams covering:
✓ Image production
✓ K-Space
✓ Interactive spatial frequency modulator
Plus learning activities on our MRI Simulator (available for 12 months after the course):
✓ Image Production
✓ k-Space
✓ k-Space- related artefact simulator
Presented by Dr Catherine Westbrook and Dr John Talbot
Day 04 Lecture Menu
✓ Image Artefacts (Extrinsic) (Talbot)
✓ Protocol Optimisation (Westbrook)
✓ Image Artefacts (Intrinsic) (Talbot)
✓ Flow and MRA (Talbot)
Plus revision sessions and interactive animated diagrams covering:
✓ Artefacts
✓ Protocol Optimisation
Plus On-Demand Revision Videos covering:
✓ An A-Z of MRI Artefacts (Talbot)
✓ Protocol Parameters and Trade-offs (Talbot)
Plus learning activities on our MRI Simulator (available for 12 months after the course):
✓ MRI Image Artefacts
✓ Protocol Optimisation
Presented by Dr Catherine Westbrook and Dr John Talbot
Available exclusively to MRI in Practice participants for 12 months.
Revision
✓ Fundamentals of MRI (Talbot)
✓ Pulse Sequences and Image Contrast (Talbot)
✓ Protocol Parameters & Tradeoffs (Talbot)
✓ Introduction to MRI Safety (Talbot)
✓ A-Z of MRI Artefacts (Talbot)
Clinical Technique
✓ The Brain (Westbrook)
✓ The Spine (Westbrook)
✓ The Body (Westbrook)
✓ The Upper Limb (Westbrook)
✓ The Lower Limb (Westbrook)
Over 50 Self-Guided learning activities for the MRI Simulator on the following topics:
✓ Fundamentals of MRI
✓ Image Contrast
✓ Instrumentation
✓ All Major Sequences
✓ Spatial Encoding
✓ k-Space
✓ Protocol and Image Optimisation
✓ MRI Artefacts (Talbot)
Clinical Technique
✓ The Brain
✓ The Body
The Society and College of Radiographers.
The Certificate of Endorsement states that this course supports the following important outcomes:
01. Practical skills
02. Knowledge base
03. Work safely
06. Manage knowledge/information
07. High-quality healthcare/education services
08. Patient-centred care and choice
09. Inter-professional/agency working or learning
11. Workforce development or staff governance
12. Service design
19. Evidence to support practice
If you are considering registering for an MRI course other than MRI in Practice, ask for evidence that they have CPD NOW endorsement and check how many of the above outcomes are supported. This is an important benchmark and without such it is likely that a course is not fit for purpose as a CPD resource. Please note that we have outcome 7 - which is your assurance of the high-quality of our courses.
Australian Society of Medical Imaging and Radiation Therapy award 30 Units of CPD for the course.
Scandinavia and Europe. We award generic CPD certificates to all participants from Scandinavia and Europe.
For any other country (with the sole exception of the USA) the course is also likely to be considered a valuable source of CPD. Please see the course info page for more information.

MRI in Practice - March Course
06 Mar 2027 - 14 Mar 2027
Open to all international locations.
The recommended study allocation is 4 days.
Participants may attend at any time over the 9 day event.
Course fee: £800
UK - CPD Now (Society and College of Radiographers) Certificate of Endorsement states that this course supports TEN learning outcomes.
Australian Society of Medical Imaging and Radiation Therapy - Awards 30 Units of credit.
Presented by Dr Catherine Westbrook and Dr John Talbot
Day 01 Lecture Menu
✓ Basic Principles (Westbrook)
✓ Image Contrast (Westbrook)
✓ MRI Instrumentation (Talbot)
✓ Introduction to MRI Safety (Talbot)
Plus revision sessions and interactive animated diagrams covering:
✓ Basic Principles
✓ Image Contrast
✓ Instrumentation
✓ Safety
Plus On-Demand revision videos covering:
✓ Fundamentals of MRI (Talbot)
✓ Image Contrast (Talbot)
✓ Introduction to MRI Safety (Talbot)
✓ Safety (Talbot)
Plus Learning exercise on our MRI Simulator covering:
✓ Basic Principles
✓ Image contrast
Presented by Dr Catherine Westbrook and Dr John Talbot
Day 02 Lecture Menu
✓ Spin Echo Sequences (Talbot)
✓ Fast Spin Echo and Inversion Recovery Sequences (Talbot)
✓ Gradient Echo Principles (Westbrook)
✓ Gradient Echo Sequences (Westbrook)
Plus revision sessions and interactive animated diagrams covering:
✓ Gradient Echo Sequences
✓ Image Contrast
✓ Spin Echo Sequences
Plus On-Demand Revision Video covering:
✓ Pulse Sequences and Image Contrast (Talbot)
Plus learning activities on our MRI Simulator (available for 12 months after the course):
✓ Spin Echo Sequences
✓ Gradient Echo Sequences
✓ Image Contrast
Presented by Dr Catherine Westbrook and Dr John Talbot
Day 03 Lecture Menu
✓ Image Production Overview (Talbot)
✓ k-Space 01 - An introduction to k-space (Westbrook)
✓ k-Space 02 - Data Acquisition and Image Production (Westbrook)
✓ k-Space 03 - Non-Cartesian Filling Methods (Westbrook)
Plus revision sessions and interactive animated diagrams covering:
✓ Image production
✓ K-Space
✓ Interactive spatial frequency modulator
Plus learning activities on our MRI Simulator (available for 12 months after the course):
✓ Image Production
✓ k-Space
✓ k-Space- related artefact simulator
Presented by Dr Catherine Westbrook and Dr John Talbot
Day 04 Lecture Menu
✓ Image Artefacts (Extrinsic) (Talbot)
✓ Protocol Optimisation (Westbrook)
✓ Image Artefacts (Intrinsic) (Talbot)
✓ Flow and MRA (Talbot)
Plus revision sessions and interactive animated diagrams covering:
✓ Artefacts
✓ Protocol Optimisation
Plus On-Demand Revision Videos covering:
✓ An A-Z of MRI Artefacts (Talbot)
✓ Protocol Parameters and Trade-offs (Talbot)
Plus learning activities on our MRI Simulator (available for 12 months after the course):
✓ MRI Image Artefacts
✓ Protocol Optimisation
Presented by Dr Catherine Westbrook and Dr John Talbot
Available exclusively to MRI in Practice participants for 12 months.
Revision
✓ Fundamentals of MRI (Talbot)
✓ Pulse Sequences and Image Contrast (Talbot)
✓ Protocol Parameters & Tradeoffs (Talbot)
✓ Introduction to MRI Safety (Talbot)
✓ A-Z of MRI Artefacts (Talbot)
Clinical Technique
✓ The Brain (Westbrook)
✓ The Spine (Westbrook)
✓ The Body (Westbrook)
✓ The Upper Limb (Westbrook)
✓ The Lower Limb (Westbrook)
Over 50 Self-Guided learning activities for the MRI Simulator on the following topics:
✓ Fundamentals of MRI
✓ Image Contrast
✓ Instrumentation
✓ All Major Sequences
✓ Spatial Encoding
✓ k-Space
✓ Protocol and Image Optimisation
✓ MRI Artefacts (Talbot)
Clinical Technique
✓ The Brain
✓ The Body
The Society and College of Radiographers.
The Certificate of Endorsement states that this course supports the following important outcomes:
01. Practical skills
02. Knowledge base
03. Work safely
06. Manage knowledge/information
07. High-quality healthcare/education services
08. Patient-centred care and choice
09. Inter-professional/agency working or learning
11. Workforce development or staff governance
12. Service design
19. Evidence to support practice
If you are considering registering for an MRI course other than MRI in Practice, ask for evidence that they have CPD NOW endorsement and check how many of the above outcomes are supported. This is an important benchmark and without such it is likely that a course is not fit for purpose as a CPD resource. Please note that we have outcome 7 - which is your assurance of the high-quality of our courses.
Australian Society of Medical Imaging and Radiation Therapy award 30 Units of CPD for the course.
Scandinavia and Europe. We award generic CPD certificates to all participants from Scandinavia and Europe.
For any other country (with the sole exception of the USA) the course is also likely to be considered a valuable source of CPD. Please see the course info page for more information.

MRI in Practice - June Course
19 Jun 2027 - 27 Jun 2027
Open to all international locations.
The recommended study allocation is 4 days.
Participants may attend at any time over the 9 day event.
Course fee: £800
UK - CPD Now (Society and College of Radiographers) Certificate of Endorsement states that this course supports TEN learning outcomes.
Australian Society of Medical Imaging and Radiation Therapy - Awards 30 Units of credit.
Presented by Dr Catherine Westbrook and Dr John Talbot
Day 01 Lecture Menu
✓ Basic Principles (Westbrook)
✓ Image Contrast (Westbrook)
✓ MRI Instrumentation (Talbot)
✓ Introduction to MRI Safety (Talbot)
Plus revision sessions and interactive animated diagrams covering:
✓ Basic Principles
✓ Image Contrast
✓ Instrumentation
✓ Safety
Plus On-Demand revision videos covering:
✓ Fundamentals of MRI (Talbot)
✓ Image Contrast (Talbot)
✓ Introduction to MRI Safety (Talbot)
✓ Safety (Talbot)
Plus Learning exercise on our MRI Simulator covering:
✓ Basic Principles
✓ Image contrast
Presented by Dr Catherine Westbrook and Dr John Talbot
Day 02 Lecture Menu
✓ Spin Echo Sequences (Talbot)
✓ Fast Spin Echo and Inversion Recovery Sequences (Talbot)
✓ Gradient Echo Principles (Westbrook)
✓ Gradient Echo Sequences (Westbrook)
Plus revision sessions and interactive animated diagrams covering:
✓ Gradient Echo Sequences
✓ Image Contrast
✓ Spin Echo Sequences
Plus On-Demand Revision Video covering:
✓ Pulse Sequences and Image Contrast (Talbot)
Plus learning activities on our MRI Simulator (available for 12 months after the course):
✓ Spin Echo Sequences
✓ Gradient Echo Sequences
✓ Image Contrast
Presented by Dr Catherine Westbrook and Dr John Talbot
Day 03 Lecture Menu
✓ Image Production Overview (Talbot)
✓ k-Space 01 - An introduction to k-space (Westbrook)
✓ k-Space 02 - Data Acquisition and Image Production (Westbrook)
✓ k-Space 03 - Non-Cartesian Filling Methods (Westbrook)
Plus revision sessions and interactive animated diagrams covering:
✓ Image production
✓ K-Space
✓ Interactive spatial frequency modulator
Plus learning activities on our MRI Simulator (available for 12 months after the course):
✓ Image Production
✓ k-Space
✓ k-Space- related artefact simulator
Presented by Dr Catherine Westbrook and Dr John Talbot
Day 04 Lecture Menu
✓ Image Artefacts (Extrinsic) (Talbot)
✓ Protocol Optimisation (Westbrook)
✓ Image Artefacts (Intrinsic) (Talbot)
✓ Flow and MRA (Talbot)
Plus revision sessions and interactive animated diagrams covering:
✓ Artefacts
✓ Protocol Optimisation
Plus On-Demand Revision Videos covering:
✓ An A-Z of MRI Artefacts (Talbot)
✓ Protocol Parameters and Trade-offs (Talbot)
Plus learning activities on our MRI Simulator (available for 12 months after the course):
✓ MRI Image Artefacts
✓ Protocol Optimisation
Presented by Dr Catherine Westbrook and Dr John Talbot
Available exclusively to MRI in Practice participants for 12 months.
Revision
✓ Fundamentals of MRI (Talbot)
✓ Pulse Sequences and Image Contrast (Talbot)
✓ Protocol Parameters & Tradeoffs (Talbot)
✓ Introduction to MRI Safety (Talbot)
✓ A-Z of MRI Artefacts (Talbot)
Clinical Technique
✓ The Brain (Westbrook)
✓ The Spine (Westbrook)
✓ The Body (Westbrook)
✓ The Upper Limb (Westbrook)
✓ The Lower Limb (Westbrook)
Over 50 Self-Guided learning activities for the MRI Simulator on the following topics:
✓ Fundamentals of MRI
✓ Image Contrast
✓ Instrumentation
✓ All Major Sequences
✓ Spatial Encoding
✓ k-Space
✓ Protocol and Image Optimisation
✓ MRI Artefacts (Talbot)
Clinical Technique
✓ The Brain
✓ The Body
The Society and College of Radiographers.
The Certificate of Endorsement states that this course supports the following important outcomes:
01. Practical skills
02. Knowledge base
03. Work safely
06. Manage knowledge/information
07. High-quality healthcare/education services
08. Patient-centred care and choice
09. Inter-professional/agency working or learning
11. Workforce development or staff governance
12. Service design
19. Evidence to support practice
If you are considering registering for an MRI course other than MRI in Practice, ask for evidence that they have CPD NOW endorsement and check how many of the above outcomes are supported. This is an important benchmark and without such it is likely that a course is not fit for purpose as a CPD resource. Please note that we have outcome 7 - which is your assurance of the high-quality of our courses.
Australian Society of Medical Imaging and Radiation Therapy award 30 Units of CPD for the course.
Scandinavia and Europe. We award generic CPD certificates to all participants from Scandinavia and Europe.
For any other country (with the sole exception of the USA) the course is also likely to be considered a valuable source of CPD. Please see the course info page for more information.
MRI in Practice Online
MRI in Practice Online
A little taster of what we offer on our online course...
The online course uses a combination of HD streaming video to present our trademark CGI graphics and user-friendly analogies that give our course an unsurpassed conceptual clarity that our participants really love. Our lectures use computer-generated imagery produced in-house and are the result of 15 years development and over 1000 CGI models and animations.
Some online course providers present their lectures directly from Zoom or by screen-sharing their own computer - this tends to result in a sub-optimal, jerky, low-resolution presentation with occasional dropouts due to loss of internet connection by the host and having to share bandwidth between a number of participants.
We don't do this, as teaching experts with over 30 years of experience in distance learning and blended learning (and, with formal academic qualifications in technology-enhanced learning) we use a custom built chatroom and Q&A panels built right into the lecture player. These allow ad hoc Q/A 24 hours a day and streaming HD video that is delivered via a professional broadcast server (AWS) to ensure the very highest quality and uninterrupted service , here is an example of what you can expect from our lectures…
Please feel free to share this video with anyone you think might be interested. There is a share icon at the top right corner of the screen when you hover your cursor over the window.